HCS Staff Tech Blog Message

This blog is written with the HCS Staff as the primary audience.
Anyone not a member of the HCS Staff may find certain content does not apply to their Google Account.

Wednesday, September 7, 2016

Scheduling a Resource in Google Calendar

Many of our buildings are now using Google Resource Calendars to schedule their shared spaces such as computer labs, media centers, book check out, etc.  Scheduling a resource is easy but there is a tiny trick that will make scheduling your resource much easier.  The instructions below will assist you:


  1. Open your Google Calendar.
  2. Select the date in which you wish to add an event in a resource calendar.  
  3. Click on the “Edit Event” button.
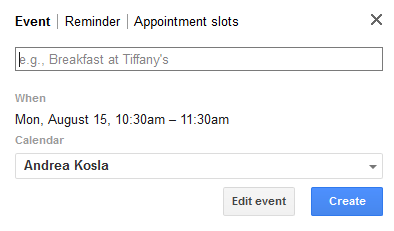
  1. Title your event, select the date and time and fill out any of the other appointment options you wish.  
  2. On the right hand side of the screen select the “Rooms, etc.” link.
  1. Click “Add” next to the resource in which you wish to create the appointment.
  2. When you are done, click the “Save” button at the top and the appointment will be added to the calendar for you.  In addition, it will add the event to YOUR Google Calendar.

* IF you have to EDIT an event you created, simply edit the event on YOUR calendar and the event will automatically be updated on the Shared Resource Calendar.

Adding A Google Resource Calendar to Your Calendar List

Many of our buildings are now using Google Resource Calendars to schedule their shared spaces such as computer labs, media centers, book check out, etc.  We assign rights to those resource, as often as possible, based upon Google Group.  For example, we would assign a the HHS LAB 204 calendar to the HHS Teachers Google Group.  When we initially assign the rights to the calendar, each end user receives an email invitation and can easily add the calendar to his/her calendar list.  

What happens if that end user is new or simply added to the Google Group AFTER the group has been assigned rights to the calendar resource?  Well, that person would not receive an email calendar invite.  Never fear!  Google Resource Calendars are designed in such a way that end users can easily find the resource and subscribe to it once they have been added to the group.  

Follow the instructions below to easily add a Google Resource Calendar for which you have been granted rights:

If you have rights to a resource Calendar (such as computer lab calendars) but don’t have the invite that was originally sent, you can still subscribe to that resource.  

  1. Log into your Google Account.
  2. Open your calendar.
  3. On the left hand side you will see “Other Calendars”.  Click the down arrow next to “Other Calendars”.
  4. Click "Browse Interesting Calendars".
  1. Click the “More” link toward the top.
  2. Click the “Resources for hartlandschools.us” link.
  1. Find the calendars you are interested in adding as a resource and click the “Subscribe” link to the right of it.  You can only add resources for which you have rights.  
  2. Your calendar will now be added to our “Other Calendars” list.
  1. If you attempt to add a calendar but are denied the ability to add it, please put in a Technology Work Order to be granted rights and we will take care of that for you.  

Tuesday, September 6, 2016

Setting your Default PDF Viewer in WIN 10

Many of you have experienced a problem reading PDF documents on your newly imaged Windows 10 Teacher Computers.  When you double click a PDF document you receive a message that looks like this:

This is happening because Windows 10 is configured so that it’s new browser (Microsoft Edge) is set as the default PDF Viewer.  In order to correct this problem, please do the following:

  1. Find a PDF document.
  2. Right click your PDF document.
  3. In the pop-up menu that appears select “Open with” and then click on “Adobe Acrobat Reader”.  
  1. If “Adobe Acrobat Reader” is not listed, select the “Choose another app” menu option and scroll through the list until you find “Adobe Acrobat Reader”.  
  2. If you want to be SURE that you consistently open PDF documents using Acrobat Reader (without having to right click each time and selecting “Open with”, then choose the “Choose another app” menu option and find “Adobe Acrobat Reader” in the list.  
  3. Highlight “Adobe Acrobat Reader” then click the checkbox below that says “Always use this app to open .pdf files”.

  1. Click OK.  

Wireless Access for Staff and Students

We have installed two new SSID’s (Service Set Identifier) to help make it easier for staff and students to access wireless resources at Hartland Schools.  Those two SSID’s are “Hartland-Staff” and “Hartland-Students”.  


Hartland-Staff
If you are a staff member, you may connect to “Hartland-Staff” by pointing your phone, personal iPad, or personal laptop to that SSID and when prompted, type in your Active Directory (which is your Hartland computer) UserID and Password.  


Hartland-Students
If you are a student, you may connect to “Hartland-Students” by pointing your phone, personal iPad, or personal laptop to that SSID and when prompted, type in your Active Directory (which is your Hartland computer) UserID and Password.

*Students with medical devices such as hart-rate or glucose monitors which use cell service or wireless to connect to the Internet (usually through a phone) in an effort to send data to their physician may enter their Active Directory UserID and Password into their device and have constant wireless access for medical data.


Hartland-Guest
This SSID currently remains and may still be used but it is not password protected and each time you connect to it with your personal devices, you will need to accept the Acceptable Use Policy.  


Staff may feel free to share this information with students and parents.